OMNI V 3 horsepower Blender
User Manual and SAFETY Instructions
CALL (801) 623-3225![]() (801) 623-3225
(801) 623-3225

 Before you begin blending, please review all instructions of the electronic manual carefully. Familiarize yourself with all warnings, warranty issues, what could void the warranty, would could cause damage to the blender and/or injury to you or bystanders, and anything else in order to perform appropriate blender blade and container maintenance.
 Some of the information may be redundant. This is not to annoy you but to emphasize on its importance and also so nobody can say we didn't tell you. If you have any questions, email, or call us at (801)-623-3225.
Follow the safety instructions. Please note, if you do not follow the safety instructions correctly, it can lead to blender damage, to bodily injury, dismemberment, and / or even death (Although that nobody has ever died from a blender, as far as we know). If any of this happens, by using the blender/purchasing it, you agree to hold us harmless from any injury, liability, damage(s), etc..., that may arise from its use and/or misuse.
Misuse will void the warranty on your OMNI blender. Please note also, this blender is not a toy and it is only to be used for blending food stuff, not fake diamonds, magnets, wood sticks or brooms, even iPods or cell phones, etc.
KEEP THE BLENDER, BLADE, AND/OR CONTAINER OUT OF REACH OF CHILDREN WHO MIGHT BE TOO YOUNG TO SAFELY OPERATE THE BLENDER. NO, THE BLADE CANNOT BE STOPPED BY H
 AND DURING OPERATION.
 Most obstructions won’t stop the blade from turning. Please do not ever put your hand and/or any part of your limbs into the container during blending operation. To be safe, if you have to remove an object from the blade and/or container, remove the container from the blender base and only then stick your hand into the inside of the container to remove that object (and do that at your own risk – blades are sharp and could cut your fingers).
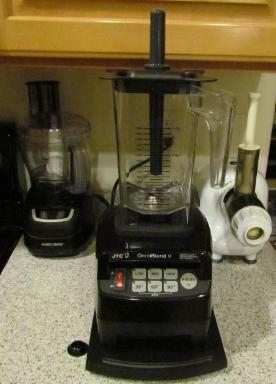
As you can see on the picture to the left, the OMNI V Blender with the square low-profile 2 quart / 64oz Co-Polyester (Eastman Tritan (tm) ) BPA-FREE container at a total height of 16.5 inches tall fits under most cabinets against the wall on top of your counter-top for storage. It is not recommended to store away the blender out of sight because you will likely use it much less than if you were to see the blender daily. If you happen to have the competitor's blender, with a 2 hp or 3 hp blender, the OMNI Container will fit (call to confirm).Another quick note about the 64oz OMNI Container (square and low-profile), JTC, the OMNI factory refers to it as a 1.5 liter container since the measure marks on the container go up to 50 ounces. We however call it a 64oz container because it fits the 64oz container size based on comparisons with Blender Jars from most other popular competitors' blender brands.
OMNI V 3 HP Blender (MODEL: TM-800A)
 Your OMNI V 3 hp blender is manufactured in WHITE, BLACK, and RED. We have all 3 colors in stock since February 2014. Regardless, these instructions and USER MANUAL information still apply to all 3 Blenders even though you may have received the blender in Color BLACK.
When unpacking the blender, you will find a brief Owners/User Manual inside, which contains the Warranty information. Concerning warranty claims, we would like to refer you to our 7 Years limited Warranty available here online. We ask you to familiarize yourself with it.
If you have a Warranty claim, in order to proof the warranty related OMNI Blender Purchase to us, call us at (801)-623-3225 and give us your credit card purchasing information that was used for the purchase and the date of your purchase. We then will try loo
 k up your name and confirm your purchase. If we can't find your information, you need to provide proof of purchase with your receipt. It is also possible that you purchased the OMNI blender from one of our dealers.
Familiarize yourself with our 30 Days Return Policy. Hopefully you want to keep your blender. This means of course that you are satisfied with it. Remember, you have to return your blender before the 30 Days are over, starting from the day you purchased it from us. The blender has to arrive back at our warehouse before the 30 days have passed.
The blender package contains the OMNI V 3 horsepower blender unit, the 64oz Blender Jar with the 6-knives multi-purpose blade, the lid and cap and the tamper. You are also receiving a free recipe book.
OMNI V 3 HP Rugged Construction Heavy Duty Professional Blender
 On the top please note the OMNI V 3 hp Blender details which are important to know and understand for your effective and safe blending operation. In order to blend safely and effectively without spilling or a mess associated to blending, always blend only with ingredients or content in the container and the appropriate lid and cap on top of the blender base and container.
Always place your hand on top of the lid to secure the container and lid during blending. Do not put the container into the dishwasher together with the stainless steel blade. Although the Co-Polyester (Eastman Tritan™) Container material is food safe and dishwasher safe, there are some parts on the blade assembly that sometimes may not react positively with some dishwasher chemicals and could cause leaking / damage to the blade assembly bearing seal. If the bearing seal breaks because of that, we cannot cover the blade assembly under warranty. As usual, feel free to contact us with any questions.
See Maintenance Videos
CAUTION:
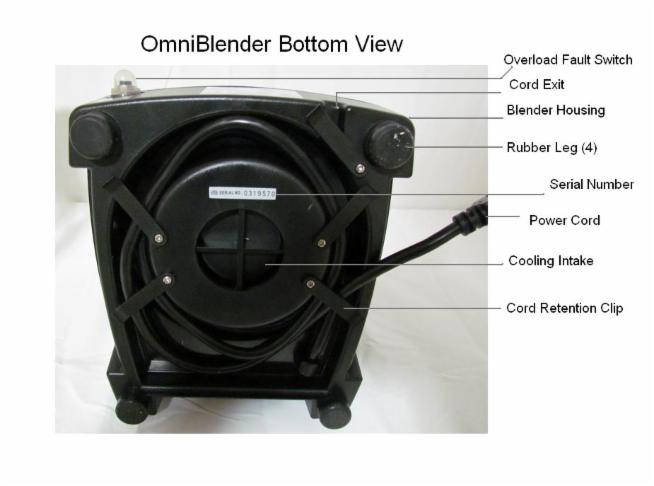
Never use the blender base without the container in place or with an empty container in place. The drive socket on top of the blender base can turn very fast and could potentially cause injuries, even bad ones, if you happen to stick your finger between the drive socket gears while the blender drive socket is running... The gear has sharp edges that are designed to connect to the drive gear on the container bottom attached to the blade. (see more details further below).BACKSIDE OF THE OMNI BLENDER
Note, the Overload Reset Button has been relocated to the bottom of the blender since March 2012.

==========================================================
Features and great Pluses of your 3 hp OMNI Blender
- Heavy Duty Professional 3 hp Blender
- Competition-compatible for parts and container interchangeability
- Quickly purees and blends even the toughest ingredients
- Rugged Construction outlasts other Blenders 5 to 1
- Speed Control allows you to puree, blend, chop, or grind
- Pre-programmed cycles using the timers 30, 60, and 90 seconds, saves you time; Just one touch easy operation
Before Operating your Blender, (see picture below) turn your blender base upside down and
 unwind the power cord from the power cord storage area until you have enough cable length to comfortably operate the blender on your counter-top. Please note the area on the back of the blender under the power cord security clip. There is a recessed area to place the power cord in so it can be protected from damage and from being in the way.
 Let the cord exit at this appropriate area for proper blender setup. Make sure that the bottom vent areas are unobstructed. And while you are looking at the back and bottom of your blender motor base, please also note the power-shut-off or overload reset button. It is on the right bottom back-side of the motor housing when you stand in front of your 3 hp OMNI blender.
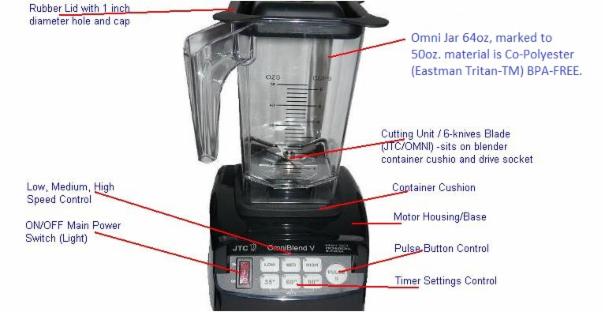
 OMNI V Blender Operating SPEED Control Keypad
The OMNI Keypad, as seen to the left, is equipped with 3 speeds: Low, Medium, and High Speed push touch-key buttons. The electronic and waterproof keypad also features 35, 60, and 90 second timer settings, and also a Pulse Button. Just push your selection until you feel a little resistance.
In order to turn on the blender:
- First plug in the power cord into your 110 Volt outlet if you bought a 110 Volt Blender, or into a 220 volt outlet if you bought a 220 volt blender. The operating circuit amperage should be a minimum of 15 amps with the 110 volt power supply and 8 amps with the 220 volt power supply.
- Switch the ON/OFF switch to the very left in Red to ON until you see the light on the ON/OFF Main Power Switch.
- Then select your speed or timer setting, or pulse. If you selected the Pulse button, the blender will only operate for as long as you hold down the PULSE button. If you use any of the TIMER or SPEED selections, you need to push once and then let go. This will cause the Blender Blade to run according to the selection you have made. If you want to prematurely turn off your blending cycle, you can push any of the operating functions (buttons) including the Main Power Switch and the PULSE button once. If you push any of the functional operating switches twice while blending, you are turning off the cycle with the first time push and you will turn it back on in the new function when pushing it the second time.
Before operating your blender, make sure that there is no water on the blender base, on top of the container cushion, or near the bottom of the blender base housing Power Plug/Cord Storage Area and Rubber Feet. Although the OMNI Blender is equipped with a seal/gasket on top under the housing where the drive socket is, it still could vacuum in / suck in water into the inside of the motor housing through any of its openings for venting. Water will obviously cause damage to the motor and/or any of the electronic switches.
If during the blending your container splashes (this can happen at times if you put too much watery liquid over 50 oz in the container - It won't happen with creamy smoothie or soup and sauce blending content)- make sure you have a towel close by to quickly wipe off and absorb any water around and/or on the blender. Never submerge the blender into water or partially cover it. Electrical shortening and shock (bodily harm) could be the result...
Also, make certain that the vent-in and vent-out areas (to keep the motor cool) on the blender are never covered or obstructed. The are on the bottom and on the sides. Besides that this would void the warranty, the blender could stop working, overheat, etc... (Actually the Safety Switch / Overload Switch on the back of the blender is also a switch that prevents the motor from overheating).
Speed Control
At your own discretion you could select the LOW SPEED Control for chopping and grading your ingredients, such as making coleslaw or sauces with chunky pieces in it and if you do not want to blend your ingredients into a fine textured substance. (In my opinion, a high performance blender makes great smoothies, purees, sauces, soups, etc., but is not a good food processor as some competitors would like consumers to believe).You could select the MEDIUM SPEED Control for little finer chopping and grading on a faster speed than on LOW. You will notice, when selecting the MEDIUM button, the speed of the blender will start out on LOW and then about 2 seconds later transition to MEDIUM SPEED.
You could select the HIGH SPEED Control for blending fine textured smoothies, purees, pate's, sauces, etc. You will notice, when selecting the HIGH SPEED Button that the blending speed in the Motor will start out on LOW, then transition to MEDIUM in about 2 seconds, and again transition to HIGH SPEED about 2 seconds later. This feature helps prevent the bursting or exploding of ingredients inside your blender container upwards towards the lid. This feature also helps therefore splashing.
For most operations, the HIGH SPEED Control is ideal and very safe because of its built-in automatic speed increase interval. If you find with any of your blending speed selected that your smoothie or soup or sauce or puree texture is still to coarse, just blend it again until you get to the desired result. You can always make the content smaller and creamier. Please note, if you put for example only carrots into your blender and you blend them without water or other juice or liquid, you will get a puree and not juice. Refer to the OMNI Videos.
PULSE Control
The Pulse feature is something that all high performance blenders should have. As can been seen in our video section, when we blended an avocado, pushing the PULSE BUTTON in short bursts lifted the avocado from the blade upwards and every time it came back down and hit the blades it was shredded smaller and smaller. I probably pushed the Pulse Button about 5 or 6 times in small bursts of each a fraction of a second. As long as you hold the PULSE button down, it will drive the motor and blade at its fastest speed and highest 3 hp blending torque. When you let go of the pulse feature, the blender stops.Avoiding Getting Stuck
 You could push the pulse button just a fraction of a second or you could hold it down for even 20, 30 or
  40 seconds or so. Of course, if you want to blend a regular smoothie, I would recommend you use the HIGH SPEED setting or any of the timer settings. The Pulse Button is also great for chopping down ice cubes into crushed ice or slush.
 I recommend you always use some small amount of water or liquid with your large bulky ingredients, at least 1/2 cup. This will help keep up the vortex flow so nothing gets stuck in the container bottom far corners where the blade cant reach. When ingredients get stuck in these areas, only the ingredients can possibly move it out from these areas towards the blade. This is where the stir rod/stick or a tamper could come in handy at times. But it is not always completely effective when it does not reach that far. A tamper usually reaches just as far right above the blades without touching the blades.
If something is stuck right below the blades in the far corners (and that could apply to any blender container brand), either taking off the container after you stop the blender motor, and shaking it carefully without spilling, or adding little water, might help. And remember, as long as you use water or some kind of a foodstuff liquid or juice, just enough to keep the content moving, you will never get stuck. Real tricky ingredients are ice cubes, flax seed, and any other oily dry goods, and when blending nut-butter in less than 8 oz quantity. They sometimes pile up on the side of the container wall and the blade cannot reach the content anymore and just turns without any further ingredients movement inside. That is when you need to either shake the content, stir it or add liquid... - SEE VIDEOS
The main reason the tamper or rod is or should be used is for emergencies only. Never use a fork, a spoon, or knife, etc, or your hand. Any of these methods to stir your ingredients could lead to injuries and/or damage the blender, the blade, the drive socket, and of course your spoon, fork, etc... Please see the warranty information. And use the rod/tamper stick only with the lid in place on top of the container jar. This will help prevent blending up the tamper rod.
Timer Setting Control
The timer settings on the OMNI V blender are 35 seconds, 60 seconds, and 90 seconds. The 60 second feature has one pre-programmed slow-down-brief stop interval built in. The 90 seconds feature has 2 of these intervals built in and the 35 seconds feature does not have any. This short interval speed slow-down or brief stop helps to stir the ingredients and turn them over so the top of the ingredients collapses back down towards the blades. These interval processes take only a few seconds. Caution: The blender, when too light due to the lack of heavy ingredients, tends to move a little during this interval process. Putting your hand slightly onto the container lid top may help prevent this movement and keep the container from lifting off (only when too light).
At the end of each timed blending cycle, the OMNI blender will briefly beep to signal that the cycle is complete. And just like with the SPEED selections above, the timer settings too start out with low, then go to medium, and then to high speed. Each timer setting always turns to HIGH SPEED after about 3 seconds.
As you can imagine, the blender won't know what ingredients you put into the container and how long they may have to be blended. Therefore, it is possible that the blending of your smoothie, ice cream, sauce, etc... is completely done before the selected timed blending program is finished. If that's the case, just push any button to stop the operation. If you find that the blending is not complete, just repeat the blending process, or use the 90 second setting for longer blending.
To get your ingredients blended to about 100 F Degrees, it takes usually about 2 minutes or so, depending on how hot or cold the water was when you started out the blending process. Remember, refrigerated ingredients will usually cool the water down. NOTE, it is not recommended to use your high performance blender as a cooking device. Hot soup is best created by adding hot water heated up by an alternate heating source.
TIMER SETTINGS - TIME OF BLENDING - AND HOT TEMPERATURES
The HIGH SPEED setting will blend the ingredients without any end or stop. You will have to turn off the blender manually in order to stop the blending process. Although not safe or not recommended, it would theoretically take about 5-6 minutes to heat up the ingredients to about 140 to 160 degrees Fahrenheit. The reason it is not recommended to use the high performance blender as a heating or cooking device is because of the associated scolding hazard. The container is not fix mounted onto the blender base and could by accident be tipped over. Spilling hot tempered water or other ingredients on your skin could lead to injury / burns. However, yes, it is correct, the blender has the power to heat up the ingredient media because of its 3 hp motor power.
FREEZING
There is not a single blender in the world that can freeze any ingredients. Only a refrigeration system can do that on command. If you want to make ice cream or sorbet, add sufficient ice cubes on top of your fruit ingredients. Add little water (about 1/2 cup). Then use the stir stick and the pulse button to turn the ice cubes and fruit into your favorite sorbet. Ice cream can also nicely be made by using cashew nuts as an alternative to milk.USING THE TAMPER
 The plastic tamper is a sanitary way to stir and push down on ingredients just in case you get stuck. But if you blend the plastic tamper by accident then you have to throw away your entire smoothie. Plastic is not a consumable food. And the plastic tamper may have to be thrown away as well.
 Always use the emergency stirring rod with the appropriate lid in place, and the center cap removed. Sticking the tamper into the container towards the blades without the lid in place and/or using any self-pronounced stir stick (fork, spoon, spatula, etc...) could of course damage the blade, the container, the drive socket, the motor, etc. and/or all of the above. Injuries may also be possible, and for sure you will loose your tamper or stir device.
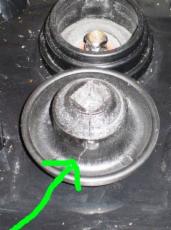
The Drive Socket or the Motor can also break if you try to or actually block the blades while turning, even to a dead stop or an attempted blade stop and an obstruction that keeps the blades from turning. A large enough wooden stick or a plastic dowel or rod could be such an obstruction. See the image to the right, pointing out the broken drive socket.
If you are worried about the drive socket quality, the drive socket is meant to break before the motor axle breaks so it can protect the motor. If you think about it, the motor axle is steel and the blade drive gear and blade itself are all steel as well. Of course the drive socket would give in before anything else. It is meant to be that way. That is why even the competitors provide a replacement drive socket with its commercial blenders.
Disclaimer: We are not suggesting that the OMNI Blender may need a tamper for stirring. The purpose of the plastic dowel is primarily safety. Maybe you are going to use the tamper 1 out of 50 blending cycles.... it is unsure. In any case, it is unsafe to stick a fork, spoon, or other device into the container during blending... Keep in mind that the blades are very sharp and the 3 hp blender causes the blade to turn very forceful and fast. You are not able to stop the blade by hand without sustaining serious injury.
Cleaning
To clean the Blender housing and keypad use just a damp towel or cleaning rug to care for it. Do not use abrasive materials for cleaning as this will scratch the blender housing surface. Too much water use could cause water to enter into the housing and could cause motor and/or electronic component damage, including electric shock. Before cleaning the blender with the moist or damp towel, unplug the power cord from the electrical outlet. In order to clean the Container
There are a few possible approaches depending on how the container was used. If a pasty heavy thick cream of some sort was blended and the remaining content cannot be rinsed out with normal running look warm water, it is recommended to use a soft brush with a handle (for example a bottle brush) to gently rub any of the left-over in the container off and then rinse it out. It is always OK to use little dishwasher soap. Definitely refrain from using Chlorine or any caustic or abrasive cleaners that could cause a metal-material clash. If you put chlorine into the container with the blade inside, the blade will start discoloring. If the remaining ingredients are difficult to reach or hard to remove from the container, then soak the container for a little while before using the brush again. If rinsing is sufficient, you can just rinse the container right after using it on the blender and serving your drinks, or you could put little (up to 12 ounces) water in it with some soap and then put the lid back on and put it on the blender for a few seconds turned on, using the pulse button. Avoid splashing onto the blender. If you use too much water, the water can easily spill through the lid. If the motor gets wet, it could damage the motor and or any circuit board section.
Although the container is dishwasher safe, it is NOT recommended to use the hot sanitizing feature in your dishwasher cleaning cycle. Just clean and rinse the container(s) by hand. Do not microwave the container. Do not scrape any debris off from the container wall with a sharp object to avoid basically scratching. And keep the container away from any stove, oven, or any other hot surfaces that could melt the plastic.
In order to clean the Blade, you could either clean the blade while inside the container or you could take it out with a wrench. Follow the blade removal instructions. We have also a video of how to remove the blade and put it back. Use a brush, soak the jar in water with mild soap, etc... it is not very difficult unless you happened to blend up raw fresh eggs to 160 degrees F. The egg usually sticks to the stainless steel parts really bad... If possible, avoid making scrambled egg in the OMNI Blender!
Safe Blender Usage
When blending, right before you turn on any of the Blender's operating controls (SPEED and TIMERS), place your hand onto the container lid. Of course the container is already sitting on top of the blender base. You do not have to hold it down with your weight. The weight of your arm and hand is enough to hold down the lid and container. This will prevent the blender from incidental moving and also prevent any potential lid-popping off the container, which could cause your ingredients to splash all over your kitchen counter, floor, and cabinets. Besides the mess, it would also mean the loss of your ingredients, or at least a portion of it. A blender is not a power tool to leave alone while blending. I would advise against that!- Do not use the blender without the Container sitting in its correct place on top of the Container Cushion which is on top of the Blender Motor housing and without proper connection of the Blade Drive Gear to the Drive Socket.
- Do not put the container onto the blender base while the blender is running and the drive socket is still turning.
- Wait for removal of the container and to put it back on top of the blender until the drive socket stands still.
- Do not use the blender with an empty container sitting on top of the blender motor base.
- An occasional powering up of the blender for brief testing maybe one or two seconds won't hurt the blender motor.
- But don't leave the blender running in any low, medium, fast, or any of the timer setting positions without a filled container, or at least ice and water in it. This could damage the motor.
Once you have plugged in the power cord into the appropriate 15 AMP minimum electric circuit, test the Main Power ON/OFF Switch. If it lights up, you have confirmed that power is going to the Blender. If it is not lit up, unplug the power cord, reset the power-overload switch on the right-back-side-bottom of the blender housing / base by pushing it in. Then plug your power cord back into the outlet and test the Main Power ON/OFF Switch again.
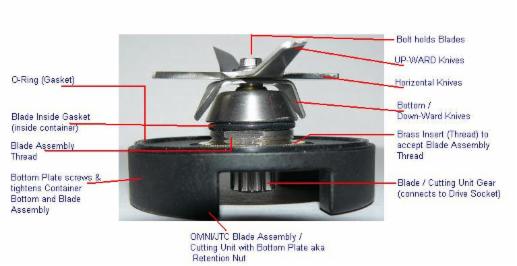
Warning: Never place the blade assembly directly onto the Drive Socket on the Motor without being properly installed in a fitting container. This is very dangerous and it could lead to serious injuries. Make sure the blade or cutting unit is securely fastened with the bottom plate / retention nut.
ABOUT THE SQUARE OMNI 64OZ CONTAINER
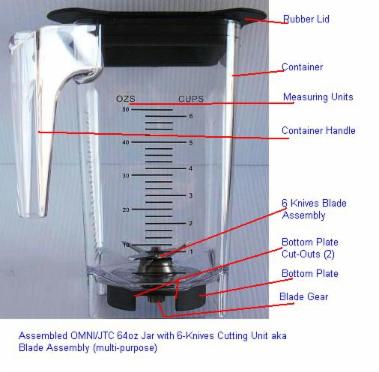 The 64oz square OMNI Container is made from FOOD-GRADE-APPROVED Polycarbonate material. It comes with a rubber lid that has a 1 inch hole in it and a corresponding plastic cap to plug that hole. The measurement scale goes up to 6 and 1/4 cups, 50 oz of liquid or 1.5 liter, although the container fits comfortably 64oz of liquid or content.
 Like with competing brands, blending all content at 64oz filled is impractical. Effective blending depending on what exactly is being blended is mostly up to the volume of 40 to 50 ounces of liquid. The ideal daily portion blending is at about the 20 to 30 fl oz level once all ingredients are blended into puree and liquid form.
The blade unit that comes with the square container standard is the OMNI 6-knives cutting unit or blade assembly. The blade assembly is made from a Japanese stainless steel alloy which is highly effective in blending all foodstuff ingredients. That is why we call it also a MULTI-PURPOSE blade. You can use it to blend grain, corn, flax, beans, etc... into flour, or nuts, fruits, vegetables, ice cream, soup, sauces, and butters.
The square container is 9.5 inches tall. This brings the total height of the blender with the container on top of it to 16.5 inches tall. The whole blender unit, used with the OMNI V 3 hp blender allows then consumers to stor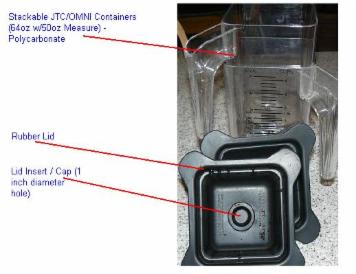 e their blender unit comfortably under their kitchen cabinet on top of their counter-top against the wall as the picture in the beginning of this manual indicates.
Another great benefit of the OMNI Polycarbonate container is that it is stack-able. This is ideal for space saving. When storing and/or stacking multiple containers together, do not interlock the handle, but rather alternate them so separation is easier.
Over time, especially when blending much with hard ingredients such as grains and ice, the container inside tends to surface scratch. Also, water stains may become visible over time. This is normal. If you want to keep your container(s) nice and clear, avoid the blending of hard ingredients and always towel-dry after rinsing / washing. You may also experience over time the blades getting stained. You can remove the blades and then perform appropriate cleaning and sharpening maintenance as well - see instructions below, also see the Maintenance Video Section
The square container is 9.5 inches tall. This brings the total height of the blender with the container on top of it to 16.5 inches tall. The whole blender unit, used with the OMNI V 3 hp blender allows then consumers to stor
e their blender unit comfortably under their kitchen cabinet on top of their counter-top against the wall as the picture in the beginning of this manual indicates. Another great benefit of the OMNI Polycarbonate container is that it is stack-able. This is ideal for space saving. When storing and/or stacking multiple containers together, do not interlock the handle, but rather alternate them so separation is easier.
Over time, especially when blending much with hard ingredients such as grains and ice, the container inside tends to surface scratch. Also, water stains may become visible over time. This is normal. If you want to keep your container(s) nice and clear, avoid the blending of hard ingredients and always towel-dry after rinsing / washing. You may also experience over time the blades getting stained. You can remove the blades and then perform appropriate cleaning and sharpening maintenance as well - see instructions below, also see the Maintenance Video Section
ABOUT THE BLADE
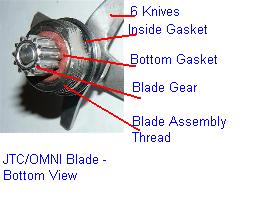 The OMNI Blade is made in Japan and the material is from a stainless steel alloy. In order to sanitize the blade you can use vinegar diluted with water. Do not ever use Chlorine. You could use rubbing alcohol. But for daily cleaning, it completely suffices to soak the blade in the container in water with little dish-washing soap.
 The OMNI Blade can be removed with a special tool which you can obtain from us - call (801)-623-3225 - see Maintenance Video. The OMNI Blade can also be sharpened, if you feel that it is needed. However, you will have to do this at your own risk. Be aware of the associated risks, nicking or damaging the blade if the blade edges are sharpened and made too thin.
The OMNI Blade is compatible with many containers for a competitor's blender brand. Use the blade only when installed inside a container and never stick your hand into the container while the jar is on the blender and especially not when the blender is running.
Also note, when you use a device to stir your smoothie or content, be aware, when or if this device reaches down to the turning blade, the device could be damaged and/or also the blade possibly, and the drive socket on the blender, depending on what exactly you are using. It is recommended that you use a tamper tool that is designed specifically for the container to be used with the lid in place so it won't touch the blade. This is for your safety!
Inappropriate Operation - Correct Stacking of Ingredients
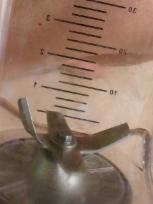 If you happen to inappropriately stick down a tamper, a fork, or some other device, and it by any chance touches the blade during operation, or if the ingredients are not properly positioned inside the container (see picture of ingredients appropriately stacked - see stacking pattern in image to the right) with the hard and frozen ingredients (ice cubes), the blade could get damaged.
 This kind of bending up of the blade is of course very hard to accomplish. Nonetheless, it is possible as this image demonstrates (to the left). Other damage to the blender, to the drive socket and of course to the item or device that you stick down towards the blade during operation can occur. Even injury could occur. That is why we would like to explicitly caution you against inappropriate operation. Please note, this blade above, because of the type of damage it sustained, it is not covered under warranty.
SPARE PARTS AND ACCESSORIES


You can obtain from us spare parts for the maintenance of your OMNI Blender. We have o-rings, drive sockets, a wrench for changing the blade assembling, and bottom plates and blade assemblies. Please refer to the detail blender descriptions above to identify the location of each part. These parts are the most common ones to wear out.
Spare parts and Accessories can be obtained from OMNIBLENDER.COM, LLC by calling 801-623-3225 801-623-3225, by email customerservice@omniblender.com, or by going to our website www.3blenders.com.
Spare parts and Accessories can be obtained from OMNIBLENDER.COM, LLC by calling 801-623-3225
 NOISE ISSUE & Sound Enclosure
The OMNI V 3 hp blender when running on full speed has been measured at 85 dB at the point of the ear (about 24 inches away from the blender motor). This noise is much quieter than with its competing 2+ peak and 3 horsepower blenders. The competitors' blender motor when on full speed is at 99 dB. If the 85 dB is still too noisy for your hearing, please consider or actually do wear a hearing protection. Noise over 100dB is considered hearing and ear damaging when exposed to it for a prolonged and/or longer period of time (more than 10 minutes). Alternatively you might want to consider a sound enclosure box, which we also offer on our website www.3blenders.com. (If you have purchased your OMNI V blender from us, you are entitled to a $20.00 purchase discount for your sound enclosure box. Call us at (801)-623-3225 to inquire about it.
Changing the Blade / Switching Containers and/or Blades
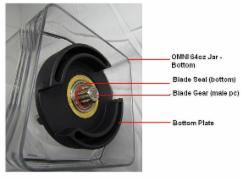
The blade in your Omni container can be switched out. You can remove it also for special maintenance purposes. Please follow
 the instructions as given by video (click here).
 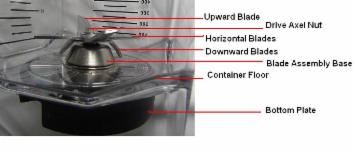 Remove the OMNI Jar from the blender. Turn the jar up-side-down. Hold the jar with one hand while inserting into the provided indentation of the bottom plate a large/long lever or the wrench tool, and turn the bottom plate counter-clockwise.
 Make sure to place a towel or some kind of a cushion inside the jar on the table - surface. Once the plate is turned completely off the blade assembly thread, and if the blade does not fall inside down to the table - surface by itself, give it a little careful push or strike loose, so the blade falls outside the indicated bottom hole from the bottom of the container. The cushion will prevent damage to the surface. The insert the new blade assembly by reversing the procedure. - See Video. Or call with questions: (801)-623-3225
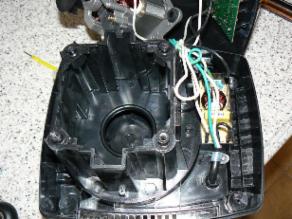
Drive Socket and changing the drive socket
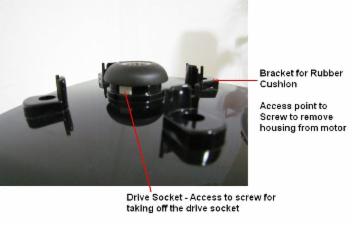 The drive socket is the turning piece that looks just about like a little mushroom right on top of the blender motor base. Turn the blender only on when you have the container in place sitting on top of the blender motor housing, and with the ingredients placed in it.
 If you were to touch the drive socket when the motor is running,
 you could sustain an injuries, also quite serious. Do not try to stop the drive socket by hand or any other device. Also, the drive socket could break if you put too much resistance on it during blending when for example pushing down on packed ice and/or using the blender for which it may not have been designed for.
 If you were to put down a dowel or a strong rod that the blade would not be able to blend up and thus creating too much abrupt resistance or even point-blank stop the blade during operation, it could break very likely the drive socket at the minimum, even possibly cause a motor and/or a blade damage.
When removing the container from the blender and/or putting the container on top of the blender, make sure that the motor / drive socket is not in motion. Removing the container during operation or to put the jar onto the blender during operation could damage the blade drive on the bottom side of the container and/or the drive socket.
If you need to change the drive socket because it is broken or for any other reason, please follow the instructions on the video under Maintenance.
How to install a new drive socket:
- Turn off the blender
- Remove the container from the blender
- Pull of the rubber cushion from the top of the blender
- Turn the blender left - side ways. You will see a white rubber piece where you need to access the drive socket screw - pull this white rubber piece off carefully. You will need to reuse this part. It keeps the water out of the motor housing.

- Use a # 0 Phillips Screwdriver or an Alan Wrench (which ever is applicable) to unscrew the drive-socket screw (counter-clockwise). Alternatively, you may be able to skip steps 4 and 5 if the drive socket is so loose that it comes off by itself without much doing or force. You might be able to get the socket off
 easily by pushing down and pulling on the socket several times until it comes off. If there is a crack in it as shown in above - right image, the drive socket will easily fall off. If the socket does not come off, not even with unscrewing the screw, then call us. You may have to return the blender to us so we can repair it for you. We want to avoid this because it also means longer down-time for you. It is much faster for us to send you a new socket by First-Class Mail
 - Then, once the drive socket is off, put the new socket on the same way, following the reversed procedure. However, you may want to turn the place of the screw to the right 1/4 quarter turn away from the original position of the former bad drive socket. You may need to try to move the drive socket into the right position to avoid vibration. Just like an unbalanced car tire / wheel, the drive socket too needs to be balanced. Call us at (801)-623-3225 if you have questions or watch our video.
The Drive Socket Maintenance
 If the drive socket cracks, the blades will stop turning and a plastic burning / rubbing smell might occur. When drive socket usually fails it is because of too much torque against it, such as an obstruction during the blades turning. It can also occur sudden due to heavy use over time. In order to perform drive socket maintenance, use the appropriate size of a Phillips screw driver and tighten the screw under the drive socket mushroom right above the blender base. - see image and instructions below:
Remove first the container rubber cushion. Remove the white rubber seal and then use the Phillips screw driver. If the screw gets loose at times, it is possible that the drive socket leaves its place from the steel motor axle. Occasionally check that by pushing on top of the still-standing drive socket. If it moves down, then the screw is loose. A drive socket is a replacement spare part, a part that wears out normally. It is inexpensive to replace. But it represents also a very key component to the safe and effective blender operation. So please don't underestimate its importance.
WARNING! Never stick your finger or any other object into the top of the socket between the sharp gripping socket edges when the blender is on. This could cause serious injury. Never put a loose blade assembly into the drive socket and then turn on the blender. The blade could take off like a helicopter and cause significant and serious injury. Remember, this is not a toy and the blades are extremely sharp!
If in doubt, call us for troubleshooting your problem. (801)-623-3225
Changing the O-Ring
 The o-ring is the rubber ring that sits right on top of the bottom plate, which screws to the thread on the bottom of the blade assembly sticking out through the bottom of the container. The purpose of the o-ring is to act as a gasket and prevent container leakage. It is a secondary seal. The primary seal to prevent container leakage is the bottom gasket ring right on the blade assembly, which cannot be take off or replaced.
If you notice condensation right between and/or above the o-ring area where the plate screws to the blade assembly threat and the bottom of the container, there could be three reasons for that. One, the bottom ring gasket right on the blade assembly could be damaged. Two, the o-ring could be worn out or damage, or THREE, the plate is maybe not tightened enough and you may have to just turn the plate clock-wise with either by hand, a wrench or some kind of a dowel or screw driver / lever that can be used to turn the plate. Please see the Maintenance Video area for more information, or call if you have questions.
Resetting the OVERLOAD /OVERHEAT DEFAULT SWITCH
 In the back of the blender motor housing, right side bottom, there is a switch that can be pushed in for resetting it just in case there was an overload and/or a power shut-off due to an increase of the motor temperature sufficient enough to potentially cause a motor over-heating and thus shutting off to prevent the motor from over-heating.
An overload power shut off could occur when you first plug in the power cable plug and/or you turn on the blender. An overload can also occur when the motor is overloaded with more torque resistance than it can handle. As you may know, there are limits to anything. Even a big pickup truck could be over-loaded...so to speak.
Just avoid pushing down towards the blade any obstructions. If an overload happens, the motor will shut off. Please just reach to the back of the blender and push the reset button to reset the blender power supply. The reset button is covered with a clear plastic switch-cover to prevent moisture from getting to it.
The Motor and Cooling System
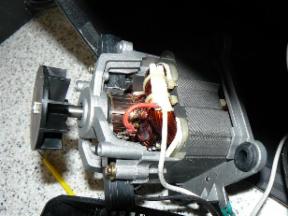 The Omni Blender is equipped with a 3 horsepower motor. You may have noticed on the label, it states a 950 Watts power consumption. This is because the motor is a self-adjusting / compensating motor and is engineered together with its operations programming (circuit board) to be an energy-efficient blender.
 This means that the blender cools more efficiently, it runs quieter, and it also runs little slower than some of its other 3 hp high performance blender competitors' blenders. The watt consumption is whatever is required to get the blending job done efficiently, well, and complete, from anywhere between 450 Watts up to about 2200 Watts. The average Watt consumption of the OMNI V blender is 950 Watts, as indicated by the label.
Some customers have asked us abo
 ut the Watt consumption and why it is so low while the blender motor is a 3 horsepower motor. Our answer is that just because you have a more fuel efficient vehicle than another one, does not mean that the more fuel efficient one nowadays has therefore less power. JTC focuses on energy efficient equipment using the latest motor and programing technology to reach best efficiency in all categories. This means greater longevity, the motor holds up longer, it keeps the wear-and-tear down, cools better, and operates quieter.
Caution: The cooling fan sucks in and blows out air to keep the motor cool. Keep water away from the table surface and/or from the container blender cushion during operation. If the cooling fan sucks in water, it could fry out the motor and/or cause a short circuit failure and damage to the circuit board and programing. During warranty inspection, the factory can detect based on visible water stains and residue that a user may have inappropriately used the blender, and/or even submerged the blender in water. Note, this will for sure void the warranty of the blender.
The Blender Label and Explanation about the details
About the 950W labeled Blender, the OMNI has a 3 horsepower motor with the torque of a 3 hp blender. It is designed and engineered to run energy efficient. In other words it is meant to cool more efficiently that will prevent it from over-heating or make it almost impossible to over-heat. It runs little slower than the most expensive competitors on the market. Therefore it is also much quieter than its competitors' 3 hp high performance high-power blenders. The watt range / power consumption is between 950 to 2200 watts, depending on the required blender force to overcome the resistance the ingredients demand during the blending cycle. Of course that is within the 3 hp range.
The bottom line is, the Blender motor is optimized to run and deliver the ideal blending environment at that least possible noise, the coolest-possible motor operation, and the highest possible blending and emulsifying power all at the same time, while consuming the least possible electricity.
The bottom line is, the Blender motor is optimized to run and deliver the ideal blending environment at that least possible noise, the coolest-possible motor operation, and the highest possible blending and emulsifying power all at the same time, while consuming the least possible electricity.

OMNIBLENDER.COM, LLC
3505 E Bay Court
Eagle Mountain, UT 84005
(801)-623-3225
Email: CustomerService@OMNIBlender.com
Website: www.3blenders.com & www.OmniBlender.COM
3505 E Bay Court
Eagle Mountain, UT 84005
(801)-623-3225
Email: CustomerService@OMNIBlender.com
Website: www.3blenders.com & www.OmniBlender.COM